 |
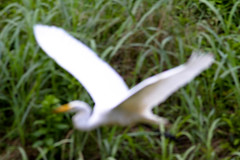
| Female Banana Spider Click Image to View Larger |
Showing posts with label 7D. Show all posts
Showing posts with label 7D. Show all posts
Monday, August 23, 2010
Picture of the Week (POTW) #10
Picture of the week for the period 15 - 21 August 2010. I shot this female Banana Spider (Argiope aurantia) this past weekend while Donna and I were walking around in the Cypress Gardens Swamp. While I don't especially care for spiders what I really liked about this picture was the spider web. It's pretty amazing how spiders can create these webs. I shot this using my Canon 7D and 70-200 f/4 lens. Eposure was 1/250th at f/5.6, ISO 500. Lately I've been using Auto ISO more. Even though the camera seems to pick a higher ISO then I would have though the images are turning out well so I'm going to stick with it for a while.
Tuesday, August 3, 2010
Rule of Thirds with the Canon Rebel 7D
If you read the previous post I did regarding the Rule of Thirds with the Canon Rebel T2i then you already know the scoop behind this post. If you haven't either click the link above or here's a brief introduction. Below is a series of pictures shot using each of the 19 focus points on the 7D. The objective is to see which of those points line up with a rule of thirds grid.
Another masterpiece I created all by myself. Move over Scott Kelby there's a new Photoshop guy in town :).
Keep in mind the focus point was placed, as close as possible on the hole in the front door of the bird house so we'll be looking at how close that hole is in relation to the rule of thirds grid lines.
This picture was taken using focus point #1. As you can see using the center point doesn't come close to any of the grid lines but still for birds in flight this is the point I'll use most often.
This picture was taken after moving the focus point to #2. It's better because it falls just below the upper horizontal line.
This picture was taken after moving the focus point to #3. As you can see this is very close to falling on the exact intersection of the horizontal and vertical lines. I'll be using this focus point more in the future.
This picture was taken after moving the focus point to #4. It's not even close so unless it gets selected when shooting using all 19 focus points I'm not likely to use it.
This shot was taken after moving the focus point to #5. It's a little low as far as the upper horizontal line goes but because it is pretty close to the horizontal line it's worth using.
This picture was taken after moving the focus point to #6. Because it falls well out side of either line I'm not likely to use it.
This picture was taken after moving the focus point to #7. It's close but not really close enough that I'd likely use it.
This picture was taken after moving the focus point to #8. Like #3 above this one is pretty close to falling right on the lower right hand intersection. This will be a preferred focus point in the future.
This picture was taken after moving the focus point to #9. Again it's close but not quite close enough in my book.
This picture was taken after moving the focus point to #10. It would to in a pinch if I couldn't select a better focus point to use.
This picture was taken after moving the focus point to #11. Close but not close enough.
This picture was taken after moving the focus point to #12. Like #3 and #8 before it I'm making it a preferred focusing point.
This picture was taken after moving the focus point to #13. Nope, doesn't cut it, IMO. Which is odd because 13 has been a lucky number for me.
This picture was taken after moving the focus point to #14. It will work since it falls along a vertical line but it's not an optimal focus point.
This picture was taken after moving the focus point to #15. It can join #13 in the I won't be using focus point club.
This picture was taken after moving the focus point to #16. It's close but not likely to be used very often.
This picture was taken after moving the focus point to #17. Bingo another one that comes very close to matching the exact intersection. So far we have #3, #8, #12 and #17 in the preferred focus point club.
This picture was taken after moving the focus point to #18. It falls above the upper horizontal line so I probably wouldn't use it.
This picture was taken after moving the focus point to #19. Although it falls below the horizontal line it's pretty close so I suppose it could be used in a pinch.
So in my opinion the optimal focus points to use with your 7D if you want to follow the rule of thirds are #3, #8, #12, and #17. Do you agree or disagree? Discuss....
 |
| Simulated 7D Focusing Screen Click Image to View Larger Version |
Keep in mind the focus point was placed, as close as possible on the hole in the front door of the bird house so we'll be looking at how close that hole is in relation to the rule of thirds grid lines.
 |
| 01 Click Image to View Larger Version |
 |
| 02 Click Image to View Larger Version |
 |
| 03 Click Image to View Larger Version |
 |
| 04 Click Image to View Larger Version |
 |
| 05 Click Image to View Larger Version |
 |
| 06 Click Image to View Larger Version |
 |
| 07 Click Image to View Larger Version |
 |
| 08 Click Image to View Larger Version |
 |
| 09 Click Image to View Larger Version |
 |
| 10 Click Image to View Larger Version |
 |
| 11 Click Image to View Larger Version |
 |
| 12 Click Image to View Larger Version |
 |
| 13 Click Image to View Larger Version |
 |
| 14 Click Image to View Larger Version |
 |
| 15 Click Image to View Larger Version |
 |
| 16 Click Image to View Larger Version |
 |
| 17 Click Image to View Larger Version |
 |
| 18 Click Image to View Larger Version |
 |
| 19 Click Image to View Larger Version |
So in my opinion the optimal focus points to use with your 7D if you want to follow the rule of thirds are #3, #8, #12, and #17. Do you agree or disagree? Discuss....
Thursday, July 29, 2010
Induro Gear Guide Part 3 - Induro BHD3 Ballhead
Welcome to part 3 of my Induro Gear Guide. In this part we'll take a look at the Induro BHD3 ballhead. I don't know what BHD really stands for but to me it means Big Heavy Duty and that's a good thing! This ballhead is a beast and I couldn't be happier with it. According to the Induro web site it weighs 2.2 pounds and is rated for a maximum load of 55 pounds. While I doubt I'll never have any camera gear that is that heavy it's nice to know I'll not outgrow this ballhead anytime soon.
Mounting the ballhead to the tripod is as simple as screwing it on. One feature that I probably should have covered when writing about the tripod and is absolute genius, in my opinion, is the inclusion of set screws in the base of the tripod head. After screwing the ballhead onto the base you can tighten the set screws to securely lock the ballhead onto the tripod center column. I can't tell you how many times with my previous setup that I'd pan to the left only to have the ballhead start to come loose from the tripod center column. I probably could have fixed it with a little locktite but I didn't have any at the house and never remembered to buy any when I was shopping at the local Lowes.
Once mounted on the tripod you can mount your camera or lens using any Arca-Swiss compatible quick release plate. I have several universal ones that I bought off of eBay that I use with various cameras and lens tripod collars. Kirk Enterprises sells universal plates for $17.00 each and I bought enough for each camera body and tripod collar that I own. This allows me to attach the plate to each camera/lens and leave it there instead of having to swap it out when I want to use a different camera/lens.
To facilitate with balancing your camera/lens the quick release mount on the tripod and some quick release plates come marked with a center line. By aligning these two marks the camera/lens is centered properly on the ballhead as shown below. Also notice that the plate installed is longer than the tripod mount. This allows you to either slide the plate forwards or backwards as needed to customize the balance. For example I may mount the lens centered as shown when shooting with the Rebel T2i because it's lighter than my 7D. When I shoot with the 7D I may adjust the position slightly forward or backwards to adjust for the heavier camera body.
The beauty of using a ballhead is that you have a virtually infinite amount of positions you can use to position the camera. This takes a bit of getting used to at first but once you use one for any length of time you'll never want to go back to using a regular tilt/pan head. By adjusting the various knobs on it you can control just how much tension is required to move the camera/lens. If I'm shooting a static subject I'll often lock the ballhead in place to make sure I have the most stable platform possible. Also, notice the notch cut into the side of the ballhead. This allows you to rotate the camera/lens combination to the side. This makes it possible to shoot in either a horizontal or portrait mode without having to remove the camera. If you're shooting with a lens that thas a tripod color like the EF 400 does then you can loosen its tension knob and rotate the camera which is very handy.
With the ballhead adjusted over to the side as shown below you can actually use it like a Gimbal Head in a pinch but as you'll see in part 4 using a Gimbal Head is SO much nicer than trying to use this setup. Something else I would do is instead of positioning the knob down as shown below I would position it towars the top so that it doesn't hit against the ballhead body.
I have no doubt that this ballhead will exceed my needs regardless of which camera/lens I mount on it. Is there anything I don't like about it? Glad you asked I have one minor nit and I honestly shouldn't mention it because it's so trivial. The knob on the bottom left in the picture above is the knob that controls how much tension is applied when you rotate the ballhead. Despite loosening it as far as it will loosen the ballhead still requires more resistance than I would expect to rotate the camera. See, I told you I shouldn't have mentioned it. As I think about it more I really can't fault the ballhead for this. It's designed to deal with loads up to 55 pounds and I may be putting what 5 or 6 pounds of weight on it at this point in time. It's no wonder it's stiff I'm only using about 1/10th of the ballheads capacity. Something else to keep in mind is I've only had this ballhead a few weeks so it hasn't been used enough to get broken in. Check back with me in 6 months time and we'll see if this continues to be an issue for me or not. I seriously doubt that it will.
One final thought - I'll be honest and say that I was seriously considering the Really Right Stuff (RRS) BH55 Ballhead. Several big name photographers use it and rave about how great it is and I have no doubt that it's a very fine Ballhead; however when you consider the BHD3 is less than half the cost of the RRS Ballhead the decision became a non brainer for me. I went with the Induro BHD3 and I had enough $$$ left over to buy the GHBA Gimbal Head that I'll be writeing about next. Cost for the Induro BHD3 Ballhead - $228.00. The link below is for the Ballhead on Amazon. If you use it to purchase one I'll receive a little commission and you'll buy an absolutely fantastic Ballhead.
 |
| Induro BHD3 Ballhead |
 |
| Canon 7D mounted on BHD3 Ballhead |
 |
| Canon EF 400 f/5.6L Lens |
 |
| Ballhead and Mounting Plate Alignment Marks |
 |
| Cutout on Side of Ballhead |
 |
| Lens Mounted Sideways |
One final thought - I'll be honest and say that I was seriously considering the Really Right Stuff (RRS) BH55 Ballhead. Several big name photographers use it and rave about how great it is and I have no doubt that it's a very fine Ballhead; however when you consider the BHD3 is less than half the cost of the RRS Ballhead the decision became a non brainer for me. I went with the Induro BHD3 and I had enough $$$ left over to buy the GHBA Gimbal Head that I'll be writeing about next. Cost for the Induro BHD3 Ballhead - $228.00. The link below is for the Ballhead on Amazon. If you use it to purchase one I'll receive a little commission and you'll buy an absolutely fantastic Ballhead.
Sunday, July 25, 2010
Fish -- It's What's for Dinner Featuring John the Heron
 |
Something else I learned is to NOT leave your GPS logger sitting on the hood of the vehicle you're driving. I had set it on the hood so that it would get satellite lock before we left the house and I forgot to put it in the truck when we left. When I remembered it we drove home and looked for it. Sadly it's gone so I'll have to order another one. If you're curious the GPS data logger I use is this one: AGL3080: Amod AGL3080 GPS Data Logger
*I picked up calling Heron's John after reading Weekend Birds II Blog Post by Brent Pennington. Be sure to check out Brent's other work. He's one hell of a photographer and always has something interesting to say in his posts.
The Wink

One of the few times I've seen a Mourning Dove sitting on something other than the ground. This one seemed to be quite curious and spent several minutes moving along the fence checking things out. I shot this with my Canon 7D and EF 400 lens. Exposure was 1/80th at 5.6, ISO 400. Camera/lens where mounted on Induro CT314 tripod and GHBA Head.
Tuesday, July 13, 2010
A Pair of House Finches
In addition to the Eastern Bluebirds that are nesting in our backyard this pair of House Finches (Carpodacus mexicanus) are regular visitors to our backyard as well. The female, shown below, was shot using Donna's Rebel T2i (I've been shooting it a lot lately) and my EF 400 f/5.6L lens. Exposure was 1/180th at f/5.6, ISO 400. She really enjoys splashing around in the bird bath and feeding on sunflower seeds.

Below is the male House Finch. I really like his red coloring. This guy can eat sunflower seeds faster than anything I've ever seen. He's also very vocal so I always know when he's around. For some reason though he likes to try and drink out of the hummingbird feeder. He'll fly over to it and try to stick his beak into one of the tubes but he can't get anything out. This picture taken with my 7D and EF 400 lens. Exposure was 1/250th @ f/5.6, ISO 400.


Below is the male House Finch. I really like his red coloring. This guy can eat sunflower seeds faster than anything I've ever seen. He's also very vocal so I always know when he's around. For some reason though he likes to try and drink out of the hummingbird feeder. He'll fly over to it and try to stick his beak into one of the tubes but he can't get anything out. This picture taken with my 7D and EF 400 lens. Exposure was 1/250th @ f/5.6, ISO 400.

Monday, July 12, 2010
Mr and Mrs Eastern Bluebird
Meet Mr and Mrs Eastern Bluebird. Mr is on the right and Mrs is on the left. These are the birds that are using the birdhouse in our backyard. This is one of the few times I've managed to get a shot of both of them together. He had just given her a small bug or something so she could feed one of their young that has hatched already. What's interesting, to me anyway, is this shot was taken at 8:30 PM and I had the ISO cranked up to 3200 on the 7D. Sure there's some noise in it but Adobe LightRoom did a great job of cleaning the image up. This was taken with my Canon 7D and EF 400 f/5.6L lens 1/90th of a second. Camera and lens were mounted on a tripod -- no way could I shoot this handheld.


Monday, June 28, 2010
Picture of the Week (POTW) #2
Picture of the week for the period 20 - 26 June 2010. I took this one of a Male Eastern Bluebird that has taken up residence in our birdhouse. He was bringing some dinner to Mrs. Bluebird but she wasn't in the birdhouse at the time. We are really enjoying watching the birds and how the interact with each other. They seem to be a bit less weary of our presence in the backyard as well. We don't know how long they've been occupying the birdhouse but we know there are 4 eggs in the nest. According to Birds of the Carolinas Field Guide, Second Edition: Companion to Birds of the Carolinas Audio CDs it takes 12 to 14 days for the eggs to incubate and then 15-18 days of fledging before the young birds will be ready to fly. This shot was taken handheld with my Canon 7D with the EF-400 f/5.6L lens. Exposure was 1/500 second @ f/5.6, ISO 400.


Sunday, June 27, 2010
Multiple Bluebird Images Merged
I've always liked those images where you see several shots merged into one. I've been taking multiple shots of the Bluebird that's nesting in our backyard and finally figured out how to merge them in Photoshop. If you had any idea how bad I suck at Photoshop this is a major accomplishment for me.


Three Shots Merged Into One

Two Shots Merged Into One

Three Shots Merged Into One
I need to work on my technique a bit. Instead of having the birdhouse centered in the frame I should move it over to the right so I can capture more of the Bluebird's approach to the birdhouse.
Thursday, June 24, 2010
Honey, I'm Home!

A male Eastern Bluebird (Sialia sialis) brings some dinner home to Mrs. Bluebird. Only problem was Mrs wasn't in the bird house :). I took this handheld with my 7D and EF 400 f/5.6L lens, 1/1000th at f/5.6, ISO 400.
Monday, June 7, 2010
Learn From My Mistake
Learn From My Mistake
Originally uploaded by zackojones
This is what happens when you fail to check your equipment settings before going out to shoot birds in flight. Previously I had been using my camera in Single-Shot mode and you guessed it. I forgot to switch it back to AI Servo when we got out of the car. This would have been a killer shot IF I weren't an idiot :).
Monday, May 31, 2010
Red-headed Woodpecker
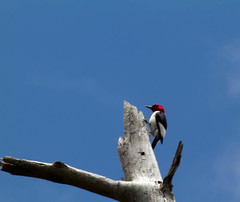
Red-headed Woodpecker
Originally uploaded by zackojones
Red-headed Woodpecker (Melanerpes erythrocephalus)
Taken with my Canon 7D and EF-400 f/5.6L Lens.
Another bird shot from this past weekend while Donna and I were out Geocaching. It's pretty amazing now that we're into birding we are constantly trying to spot and identify each bird call we here or bird that we see. We are planning on heading back to this state park again in the future as they have all kinds of birds there and we only saw a handful of different ones. Too bad it's a 2+ hour drive to get there though :(
Wood Stork
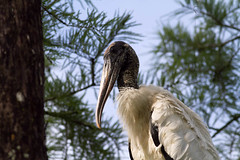
Wood Stork
Originally uploaded by zackojones
Wood Stork (Mycteria americana)
Over the long weekend Donna and I spent Saturday morning in the Dungannon Heritage Preserve which is home to the 2nd largest Wood Stork Rookery in the state of South Carolina. This was our second trip to the rookery and we wanted to see if any of the nesting Storks had any new additions to their nests.
Say, since storks delivery babies to humans who delivers babies to storks? Hopefully anyone reading this is old enough to remember the cartoons where storks would fly with a baby wrapped in a towel and then would deliver the baby to the expecting parents.
I'm happy to report that we did see some new baby Storks in the nests. We will be going back at the end of the month to check up on them again. The Storks will live the rookery some time in July and we want to see some of the new baby storks flying if possible.
This is most likely a mature male. He was sitting on a branch not far from where we were shooting and didn't seem to mind my presence at all as I moved into different positions to get the shot. This shot was taken with my Canon 7D and EF-400 f/5.6L lens 1/750 @ f/5.6, ISO 200.
On our way out we crossed paths with two feral pigs. This one stopped log enough for us to get a shot of it.
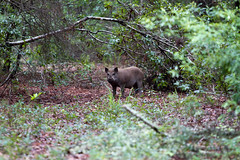
Feral Pig
Originally uploaded by zackojones
Thursday, May 6, 2010
Turkey Vulture
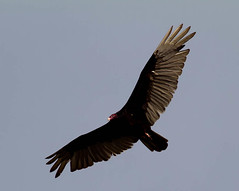
(Click image to see a larger version)
Taken in Red Bank Landing, South Carolina (Goose Creek), Canon EOS 7D and EF 400mm f/5.6L lens. Exposure was 1/500 @ f/8 ISO 100
Turkey Vulture (Catharties aura)
Yes they are terribly ugly birds when you see one up close but they are so awesome to watch when they soar overhead. I shot this particular Turkey Vulture on the base where I work. There's a park that has several ponds and nature trails for you to explore and I saw this guy circling overhead. When I saw him get a little closer I was able to get this shot.
Subscribe to:
Posts (Atom)