Showing posts with label Gear Guide. Show all posts

Monday, August 2, 2010

Induro Gear Guide Part 6 - Wrap Up

Welcome to Part 6 of my Induro Gear Guide. Hopefully the information I've provided in the first 5 parts will prove to be useful to anyone that's going through the process of buying or considering upgrading a tripod, ballhead or investing in a Gimbal Head. Shown below is my back yard birding blind. I know, I have it pretty tough don't I. Nice Lanai (upgraded with a ceiling fan this weekend!) and a glass of wine make for a fine time shooting or just watching the birds. I try to spend some time each day out here shooting and my default setup is what you see here. Depending on my mood I'll either shoot with the T2i or 7D. My investment in Induro gear breaks down as follows:

CT314 tripod - $550.00
Short Center Column - $55.00
BHD3 Ballhead - $228.00
GHBA Gimbal Head - $204.00
Extra long lens plate - $27.00

Did I ever dream I would have invested over $1000 in a tripod setup? Not in a million years but am I totally satisfied with my purchases? Absolutely. If I were doing it all over again there's probably one thing I would have done differently. No, I don't think I would have. Right now having the ability to just use the ballhead or use ballhead and Gimbal Head gives me many more options than I would have if I bought the GHB1 Gimbal Head. When the day comes that I do get the Canon 500mm Super Telephoto you can bet your bottom dollar I'll be buying either the GHB1 or GHB2 to use with it. When it comes to tripods, ballheads and Gimbal Heads Induro will always be the first place I check when it's time to buy new gear.

Birding Location
Click image to view larger

Friday, July 30, 2010

Induro Gear Guide Part 5 - Balancing Your Camera/Lens on the GHBA Gimbal Head

Welcome to Part 5 of my Induro Gear Guide. This part was originally going to be the wrap up but while reading some documentation about the GHBA Gimbal Head I decided to add another part before the wrap up. Basically the documentation said that a properly balanced camera/lens should remain in the last position you place it even with the main tension knob for the Gimbal Head completely loose. This got the wheels turning because I was wondering how close to achieving this I have been with the way I have been mounting the camera/lens onto the Gimbal Head. Normally I would align the center marks on the clamp and quick release plate and shoot away as shown below.
Initial Installation
Normally I keep some tension on the camera/lens using the main tension knob so for grins I decided to loosen the tension knob completely to see what would happen. The result is shown below.
Not Good
Not good at all! Clearly the camera was way out of balanace and needs to be adjusted within the quick release clamp. Since it was tail heavy I knew I needed to slide the camera/lens forward in the quick release plate and try again. I tried moving the camera forward about half of the available distance I could move it forward. Locked it down and then manually leveled the camera. When I released the camera the nose still tilted up, but no where near as bad as it did the first time. I don't have a picture of the camera/lens that's not zoomed in on the clamp but you can get an idea of how it looks based on the angle of the camera/lens as shown below.
Better
While the balance was certainly better after the first adjustment I decided to move it a little further and try the test again. This time when I released the camera/lens it didn't move or if it did it barely moved. As you can see from the picture below I had to move the lens plate pretty far forwad to achive the proper balance. I haven't had a chance to shoot with the camera/lens in this new postion but I'll be trying it out this coming weekend and will post a follow up next week.
Balanced
If/When you buy a Gimbal Head you'll probably want to invest in an extra long lens plate which is what I have attached to the 400 lens. The one I bought is from Berno and costs $27.00. The link below is for the plate on Amazon. If you use it to buy the plate I'll earn a small commission and you'll get a plate that'll allow you to achieve a perfectly balanced camera/lens combo on your Gimbal Head.

Thursday, July 29, 2010

Induro Gear Guide Part 4 - Induro GHBA Gimbal Head

Welcome to part 4 of my Induro Gear Guide. In this part we'll take a look at the Induro GHBA Gimbal Head. Which I'm sure stands for Gimbal Head Bad Ass because it totally is :). According to the Induro web site it weighs 1.1 pounds and for lenses up to 300mm. But Zack you're using it with a 400 are you stupid or what for exceeding the lens focal length recommendation? Well here's the scoop on that. I bought the GHBA before Induro added the the focal length recommendation. When I read this on the web site I contacted Induro asking for clarification. I'll summarize the response I received from Induro and then move on with my discussion of the GHBA Gimbal Head. The short direct answer is: it works with the 400, don't sweat it. :)

The longer answer is: Seems a lot of folks were asking Induro about a maximum focal length or lens weight for the various Gimbal Heads so Induro added this information to their web site just recently. Because there are so many different factors that come into play: camera body/lens combo, battery grip installed or not, flash attached or not, the length of the lens, etc they decided using a focal length was the best way to make a recommendation.


While I was waiting to hear back from Induro I did some of my own investigation. I wanted to see how the weight of my EF 400 lens compared to the EF 300 f/4 and EF 300 f/2.8. According to the specifications I found on the B&H Web Site my 400 weighs 2.8 pounds. The 300 f/4 weighs 2.6 pounds and the 300 2.8 weighs 6 pounds. Let's assume the camera body weighs another 2 pounds that would put my 400 with body at 4.8 pounds, the 300 f/4 at 4.6 pounds and the 300 2.8 at 8 pounds. Based upon that I would say as long as your camera/lens combo weighs 8 pounds or less the GHBA Gimbal Head should support it just fine. One very important caveat is that you are using a lens that has a tripod collar and you're mounting it to the GHBA Gimbal Head using that and not trying to attach it using the camera body.


Here's what I'll do since I'm such a nice guy. If you have any doubt that your camera/lens combination will work with the GHBA Gimbal Head send me your camera and lens for testing and I'll let you know if it works or not :)


With the Ballhead quick release plate locked into the groove on the side of the ballhead you slide the GHBA Gimbal Head into position and lock it down as shown below. You'll also want to tighten the main tension knob on the Ballhead. You don't want the Gimbal Head moving around in the Ballhead socket while you're trying to use it.


Induro GHBA Gimbal Head on BHD3 Ballhead
One thing that concerned be before I bought the Gimbal Head was how is it held in position so that it can't accidentally slide out of the quick release clamp if it should accidentally loosen up. See those two little tabs in the picture below -- that's how it's done. What you do is open the quick relase clamp and insert the Gimbal Head then slide it down until the tabs are resting against the side of the clamp and the securely tighten the tension knob to lock it into place. Once that's done you're ready to mount your camera/lens and start shooting.
Locking Tabs
Depending on who you ask you'll get different answers to the question -- Which side should be used when mounting the lens? According to famed wild life photographer Moose Peterson you should use a right side mount as pictured below. His reasoning is this allows you to rest your left hand on the lens for proper long lens technique. He recommends placing your left hand on top of the lens when shooting. He may be on to something since he routinely shoots with 500 and 600mm lenses but he's also using a different Gimbal Head so perhaps that has something to do with it as well.
GHBA Gimbal Head with Canon EF 400 Lens Right Side Mount
My preferred method is to mount the lens as shown below. Instead of resting my hand on the lens I normally rest it on top of the "T". This allows me to accomplish three tasks without removing my hand from the shutter button: (1) I can manually focus the lens, if needed, (2) I can loosen/tighten the tension knob on the lens if I want to change orientation, and (3) I can control the tension on the main tension knob if it needs adjustment. So who's method is better? Well mine of course, but seriously it doesn't really matter which method you use. Try them both and see which one works best for you. If you're currently using this style of Gimbal Head I'd love to hear if you use a righty or lefty mount.
GHBA Gimbal Head with Canon EF 400 Lens Left Side Mount
One thing you'll read about when researching Gimbal Heads is how they provide a near weightless feeling when your camera/lens are mounted and balanced properly. (Probably balance can be achieved by sliding the lens forward or backwards in the quick release mount. That's why I have a long lens plate attached to the EF 400). What they say is true, it's not marketing hype. I resisted going with a Gimbal Head because I felt there was no way that it would work for me. I felt I would be too constrained using it. My background is in sports photography so I'm used to being able to move the camera into any position I want as the action changes to get the shot. I don't feel the least bit constrained using the Gimbal Head and the set up you see above his now how I shoot most of the time.

I am 100% certain my birding photography has improved since I've started using a Gimbal Head. That being said is do I have any dislikes or regrets about buying it? Yes but again my dislike is one that I probably shouldn't mention but will anyway. I'm slowly incorporating flash into my birding photography and right now there isn't any kind of accessory bracket available that would allow me to mount my flash above the camera like you can with similary style Gimbal Head manufacturered by a different company. I have a son that is currently serving as an Aircraft Mechanic in the Marines (Quick shout out to all service men and women in all branches. A huge THANK YOU for your service) and I'm going to see if he can use his sheet metal skills to fabricate something for me. Of course the ultimate solution would be if Induro made one for all of their Gimbal Heads. That would make me one happy camper.

I also have one regret after buying this Gimbal Head. Had I known in advance that I would enjoy using it so much I wouldn't have bought the BHD3 BallHead and GHBA Gimbal Head. I would have gone right for either the GHB1 or GHB2 Gimbal Head instead. Using a Gimbal Head has changed my game that much that I always want to shoot with it. For now, though the combination of Ballhead and separate Gimbal Head gives me the best of both worlds. When I do get that Canon Super Telephoto I'll probably buy the GHB2 Gimbal Head to go along with it but we'll see by the time I can buy that lens Induro may have come out with a GHB3 or something else that would work better for me.

Cost for the Induro GHBA Gimbal Head - $204.00. The link below is for the Ballhead on Amazon. If you use it to purchase one I'll receive a little commission and you'll get an easy to use Gimbal Head that you'll love as much as I love mine.

Induro Gear Guide Part 3 - Induro BHD3 Ballhead

Welcome to part 3 of my Induro Gear Guide. In this part we'll take a look at the Induro BHD3 ballhead. I don't know what BHD really stands for but to me it means Big Heavy Duty and that's a good thing! This ballhead is a beast and I couldn't be happier with it. According to the Induro web site it weighs 2.2 pounds and is rated for a maximum load of 55 pounds. While I doubt I'll never have any camera gear that is that heavy it's nice to know I'll not outgrow this ballhead anytime soon.
Induro BHD3 Ballhead
Mounting the ballhead to the tripod is as simple as screwing it on. One feature that I probably should have covered when writing about the tripod and is absolute genius, in my opinion, is the inclusion of set screws in the base of the tripod head. After screwing the ballhead onto the base you can tighten the set screws to securely lock the ballhead onto the tripod center column. I can't tell you how many times with my previous setup that I'd pan to the left only to have the ballhead start to come loose from the tripod center column. I probably could have fixed it with a little locktite but I didn't have any at the house and never remembered to buy any when I was shopping at the local Lowes.
Canon 7D mounted on BHD3 Ballhead
Once mounted on the tripod you can mount your camera or lens using any Arca-Swiss compatible quick release plate. I have several universal ones that I bought off of eBay that I use with various cameras and lens tripod collars. Kirk Enterprises sells universal plates for $17.00 each and I bought enough for each camera body and tripod collar that I own. This allows me to attach the plate to each camera/lens and leave it there instead of having to swap it out when I want to use a different camera/lens.
Canon EF 400 f/5.6L Lens
To facilitate with balancing your camera/lens the quick release mount on the tripod and some quick release plates come marked with a center line. By aligning these two marks the camera/lens is centered properly on the ballhead as shown below. Also notice that the plate installed is longer than the tripod mount. This allows you to either slide the plate forwards or backwards as needed to customize the balance. For example I may mount the lens centered as shown when shooting with the Rebel T2i because it's lighter than my 7D. When I shoot with the 7D I may adjust the position slightly forward or backwards to adjust for the heavier camera body.
Ballhead and Mounting Plate Alignment Marks
The beauty of using a ballhead is that you have a virtually infinite amount of positions you can use to position the camera. This takes a bit of getting used to at first but once you use one for any length of time you'll never want to go back to using a regular tilt/pan head. By adjusting the various knobs on it you can control just how much tension is required to move the camera/lens. If I'm shooting a static subject I'll often lock the ballhead in place to make sure I have the most stable platform possible. Also, notice the notch cut into the side of the ballhead. This allows you to rotate the camera/lens combination to the side. This makes it possible to shoot in either a horizontal or portrait mode without having to remove the camera. If you're shooting with a lens that thas a tripod color like the EF 400 does then you can loosen its tension knob and rotate the camera which is very handy.
Cutout on Side of Ballhead
With the ballhead adjusted over to the side as shown below you can actually use it like a Gimbal Head in a pinch but as you'll see in part 4 using a Gimbal Head is SO much nicer than trying to use this setup. Something else I would do is instead of positioning the knob down as shown below I would position it towars the top so that it doesn't hit against the ballhead body.
Lens Mounted Sideways
I have no doubt that this ballhead will exceed my needs regardless of which camera/lens I mount on it. Is there anything I don't like about it? Glad you asked I have one minor nit and I honestly shouldn't mention it because it's so trivial. The knob on the bottom left in the picture above is the knob that controls how much tension is applied when you rotate the ballhead. Despite loosening it as far as it will loosen the ballhead still requires more resistance than I would expect to rotate the camera. See, I told you I shouldn't have mentioned it. As I think about it more I really can't fault the ballhead for this. It's designed to deal with loads up to 55 pounds and I may be putting what 5 or 6 pounds of weight on it at this point in time. It's no wonder it's stiff I'm only using about 1/10th of the ballheads capacity. Something else to keep in mind is I've only had this ballhead a few weeks so it hasn't been used enough to get broken in. Check back with me in 6 months time and we'll see if this continues to be an issue for me or not. I seriously doubt that it will.


One final thought - I'll be honest and say that I was seriously considering the Really Right Stuff (RRS) BH55 Ballhead. Several big name photographers use it and rave about how great it is and I have no doubt that it's a very fine Ballhead; however when you consider the BHD3 is less than half the cost of the RRS Ballhead the decision became a non brainer for me. I went with the Induro BHD3 and I had enough $$$ left over to buy the GHBA Gimbal Head that I'll be writeing about next. Cost for the Induro BHD3 Ballhead - $228.00. The link below is for the Ballhead on Amazon. If you use it to purchase one I'll receive a little commission and you'll buy an absolutely fantastic Ballhead.

Wednesday, July 28, 2010

Induro Gear Guide Part 2 - Induro CT314 Tripod

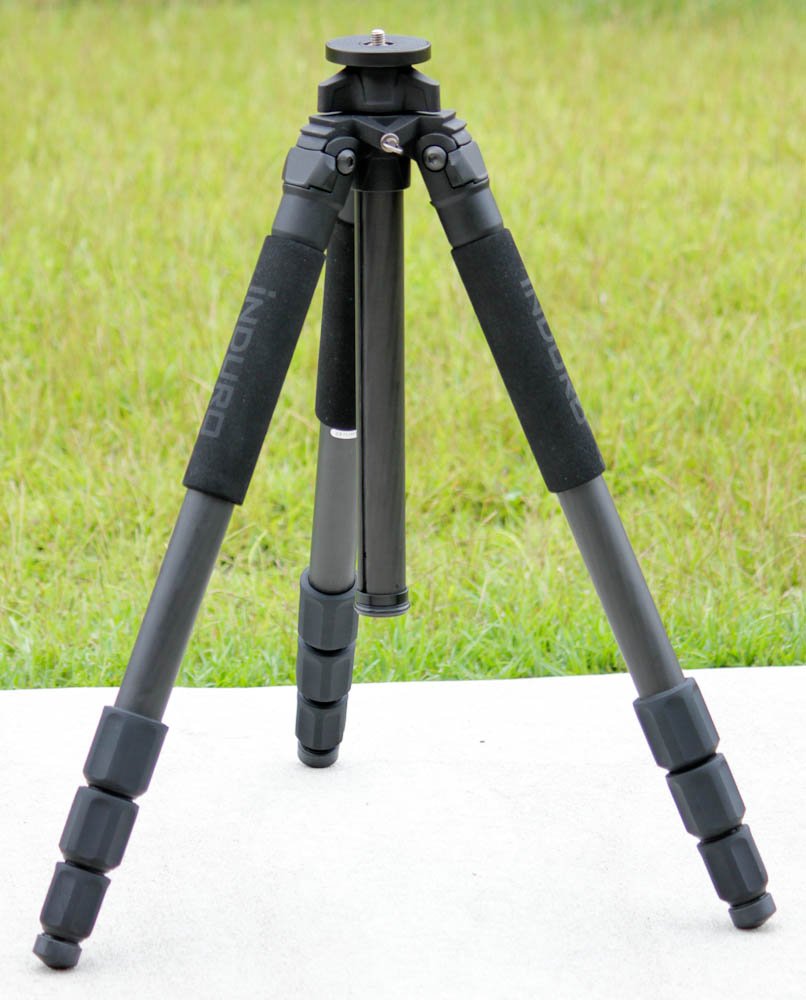
Welcome to part 2 of my Induro Gear Guide. In this part we'll take a look at the Induro CT314 Carbon Fiber tripod. I'll provide a description of the tripod, its features as well as things I like and don't like about it. This post is heavy with pictures so it may take a bit to load. When looking for a new tripod I wanted something that would work with my equipment now as well as something that would work with my equipment 5 or 10 years from now. I know at some point in the future I'll be getting one of Canon's super telephoto lenses and those work best on a tripod. I also consider the tripod as the foundation for my photography gear so like a house, if it's built on a solid foundation you should be good to go. Weighing in at 5 pounds the CT314 tripod is rated for a maximum load of approximately 40 pounds.

Induro CT314 Tripod
This is how the tripod looks when you take it out of the box. In addition to the tripod you get a carrying case and a tool pack as pictured below.
Included Tools and Tool Case

Tripod with Center Column Fully Extended
Having an extra long center column is a nice addition but it also has its drawbacks. One of them being that it limits how low you can position the camera on the tripod as you'll see shortly.
Tripod With Legs Splayed and Locked
Before anyone bothers to tell me yes I know the center column isn't straight :). That's my fault and not the fault of the tripod. I just didn't lock one of the legs properly. Crooked center column aside you can see that with the legs splayed into the first position you can get down fairly low with the tripod.
Tripod With Legs Fully Splayed
Notice how the center column is straight this time. See I'm a quick learner :). Here you can clearly see one of the drawbacks of the extra long center column. You can only get your camera so low using it. Fortunately Induro has a solution to the problem. They sell a separate column that is shorter and allows you to get down very low.
Extra Long and Optional Shot Center Columns
I've never used the tripod with the longer center column. I knew I wanted to be able to get down in the weeds, literally, with the tripod so I bought the shorter center column and that's all I've used. 
Tripod Fully Splayed With Short Center Column Installed.
Photo assistant Tiger.
Now that's what I'm talking about. With the short center column installed and the legs fully splayed you can get down low for those ground level shots.

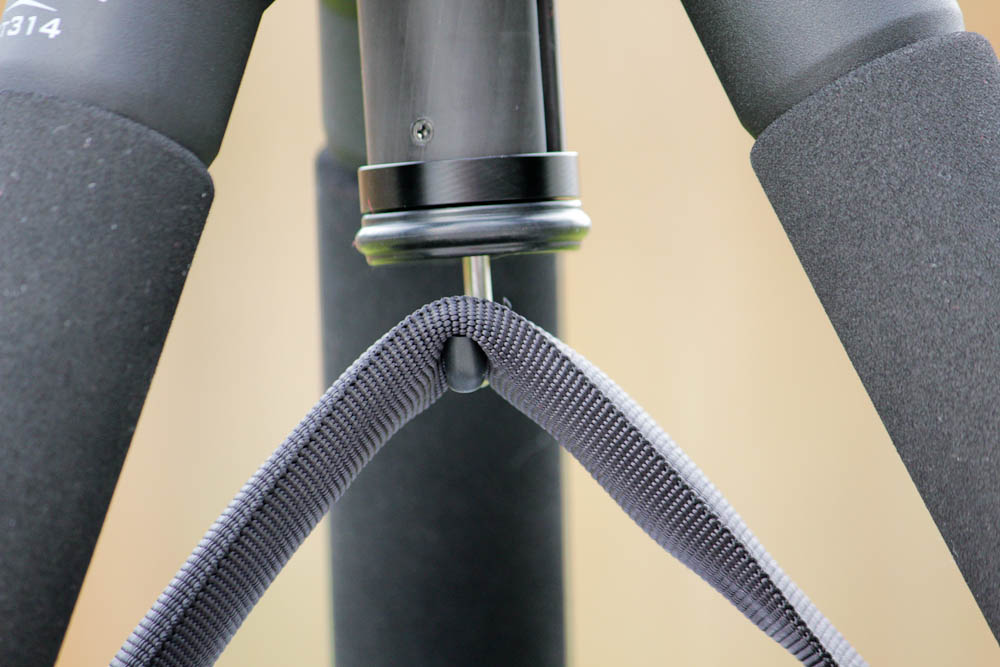
The tripod includes a spring-loaded hook that attaches to the bottom of the center column. You can hook your bag or something else to it to get the tripod that much more stability (not that it really needs any). One problem for me though is the hook just isn't quite big enough to fit around the handle of my camera backpack as shown below.
Camera Bag and Tripod Hook
Don't fret though, I have a simple solution for the problem.
Camera Bag and Tripod Hook -- Problem Solved
By using a large carabiner I'm able to hook one end around my camera backpack handle and the other on the hook. This works like a champ.
As I mentioned in part 1 one of the issues I had with my old tripod was that it wouldn't extend high enough for me to use without squatting down. That problem was easily solved with this tripod.

Tripod with Bottom Legs Extended

Tripod with Bottom and Middle Legs Extended

Tripod With All Three Legs Extended
I realize the third photo makes the tripod look 10 feet tall. It isn't. That's due to the angle I shot it from.

Tripod With All Three Legs Extended
To give you some idea of the height of the tripod the fence behind it is 6 feet tall.

Tripod Center Column Locking Ring
See that locking ring above. Make sure it's nice and tight otherwise you're liable to think there's something wrong with the tripod when there really isn't. Don't ask me how I know this tidbit of knowledge -- it's a secret :).

Overall I'm extremely pleased with the tripod. I can't thank Eric Brown enough for his review which turned me onto Induro's product line. Although I am extremely pleased with it there are a couple of things I didn't like but have managed to solve bot of them quite easily. First I didn't like that the tripod only comes with the long center column. The short column is a $55.00 accessory. It would be nice if Induro offered the tripod with our choice of center columns. The second being spring loaded hook on the bottom of the center column not being long enough to accommodate my particular backpack; however, that problem was easily solved with the addition of a large carabiner. Am I being overly picky about my dislikes? Probably so especially since I was able to solve both issues easily. It's tough for me to find any serious fault with the tripod. I have no doubt it'll be supporting my gear for years to come. Total cost for tripod and short column: $605.00 and worth every penny of it.

As I use the tripod in the coming months I'll be certain to post follow ups about it. I plan to include shots of it being used out in the field. It's nice to see it on a clean concrete pad but just how often do we shoot from that environment?

So what didn't I cover that you think I should have? Please let me know where details are lacking and I'll add them. If you prefer to email me privately instead of leaving a comment send them to zack at zdpictures dot com.

If after reading this fantastic guide and feel inclined to buy one of these tripods I'd appreciate if you'd use the link below. It's an affiliate link from Amazon and if you buy I'll earn a small commission. 


Tuesday, July 27, 2010

Induro Gear Guide Part 1 - Introduction

Not long ago I posted a photo of my Canon PowerShot D10 mounted on my Induro Tripod/Ballhead. (Link to Previous Post). Below is a similar shot but this is my advanced set up for birding :).

Advanced Tripod Setup
Pictured is the Induro CT314 tripod, BHD3 Ballhead, and GHBA Gimbal head. This is the setup I now use for 99% of my shots taken with a camera mounted on a tripod. Normally I use a 7D and EF 400 lens and not that dinky Powershot D10. Over the next few days I'm planning to post reviews of each of these components.

Prior to buying this Induro gear I had been using a Velbon tripod and Kirk BH-3 ballhead. I liked this combination because it was light but there were a couple of major drawbacks with it. First the Velbon tripod did not extend high enough for me to use it without squatting down. As I have grown to use a tripod more and more this became a major problem. It was possible to get the camera to eye level but I had to extend the center column to do so and extending it just made things unstable. The Kirk BH-3 ballhead is a very nice one but it was rated for a maximum load of 15 pounds. While this may sound like a lot of weight I was experiencing some slippage with the ballhead. Upon returning the ballhead to Kirk they replaced it, no questions asked. Kudos to Kirk for the fine customer service. I'm going to sell the Kirk ballhead on eBay and stick with my current Induro one instead because the new ballhead is rated for a much heavier load and eventually I'm planning to add the Canon EF-500mm monster lens to my collection.

Investing in a tripod setup is something I spent a lot of time researching and fretting over. I knew I wanted something that would extend high enough that I wouldn't have to squat down and I also wanted something that would get down low to the ground. This was an essential requirement because I like shooting stuff up in the sky or trees and Donna likes shooting flowers so I wanted a tripod that would meet both our needs. I wanted it to be relatively light and rock steady. I find it somewhat funny when folks complain about the weight of their gear. If you don't want to lug around an extra 5 pounds then lose 5 pounds from your body :). While the new tripod setup is heavier than my old setup I'm kind of like an old pack mule -- the weight difference between the two isn't great enough that I've noticed any difference. I spent hours reading reviews and forum posts to find out which tripods people liked and didn't like and why. Gitzo was the name I saw most often and so I started leaning heavily towards Gitzo.

While doing my research I found the Photography Minute Blog by Eric Brown. Since he's a fellow Canon 7D and EF 400 shooter I knew his tripod needs were similar to mine. After reading his Induro CT314 Tripod Review I started looking at Induro's gear and it wasn't long before I knew I had found the compnay that I would be buying my tripod gear from.

In my reviews over the next few days I plan to write about the thinks I like and don't like about each of the products I now own. Hopefully this information will help the next person considering such an upgrade have an easier time making a decision that I had when I went through it. If you're reading this and are undecided and don't want to read all of the other posts here's the answer to the $64,000 question -- buy Induro. You'll love it.

As I write the reviews the text below will be turned into links to those reviews.

Induro Gear Guide Part 2 - Induro CT314 Tripod
Induro Gear Guide Part 3 - Induro BHD3 Ballhead
Induro Gear Guide Part 4 - Induro GHBA Gimbal Head
Induro Gear Guide Part 5 - Balancing Your Camera/Lens on the GHBA Gimbal Head
Induro Gear Guide Part 6 - Wrap up