Friday, September 21, 2012

LensProToGo 52 Week Photo Project - Week 38 Submission

My submission for Week 38 themed Pink

McKenzie Spangler, born Tuesday 18 September 2012 at 3:43 PM. Here she's being held by her father, Terry who just missed her birth by less than two hours. He was finishing up some technical traning at Fort Sill in Lawton, OK. The little pink mits on her hands are there to prevent her from scratching her face. For some reason you're not supposed to cut a new born's fingernails for the first 30 days after they are born.

Wednesday, September 12, 2012

LensProToGo 52 Week Photo Project - Week 37 Submission

My submission for week 37 themed Football

I was lucky enough to get picked up as a school sports photographer while my son was playing football in high school. These are some of the shots I took that included him in the photo.

The top photo is one of my favorites for a couple of reasons -- they were playing in the Georgia Dome which is a pretty awesome thing for a high school kid plus it was one of the first games I got to photograh.

Middle Left - Another shot from the Georgia Dome where you can see the Falcons logo in the background.

Middle Center - Andrew "Bloodyhead" Jones as he was nicknamed. He got that nickname on the first day of practice when after making a hard hit on another player he removed his helmet and his forhead was bleeding. The coach said "God you've got a Bloodyhead." and the rest, as they say, is history.

Middle Right - Making a tackle.

Bottom - Perhaps my favorite photo of him playing. If you were to zoom in you can just see the intensity on his face. Unfortunately he injured his right shoulder on this play and that pretty much put an end to his career as a linebacker.

Tuesday, September 11, 2012

LensProToGo 52 Week Photo Project - Week 36 Submission

My Submission for week 36 themed Sunset.

I wanted to come up with something a little different for my sunset shot so Donna and I headed to the pool along with our waterproof Canon Point & Shoot. I really like the lines on the water surface. It reminds me of fire and leads you to the setting sun in the background.

Saturday, September 8, 2012

Rule of Thirds with the Nikon D3100

One of my most read posts is 
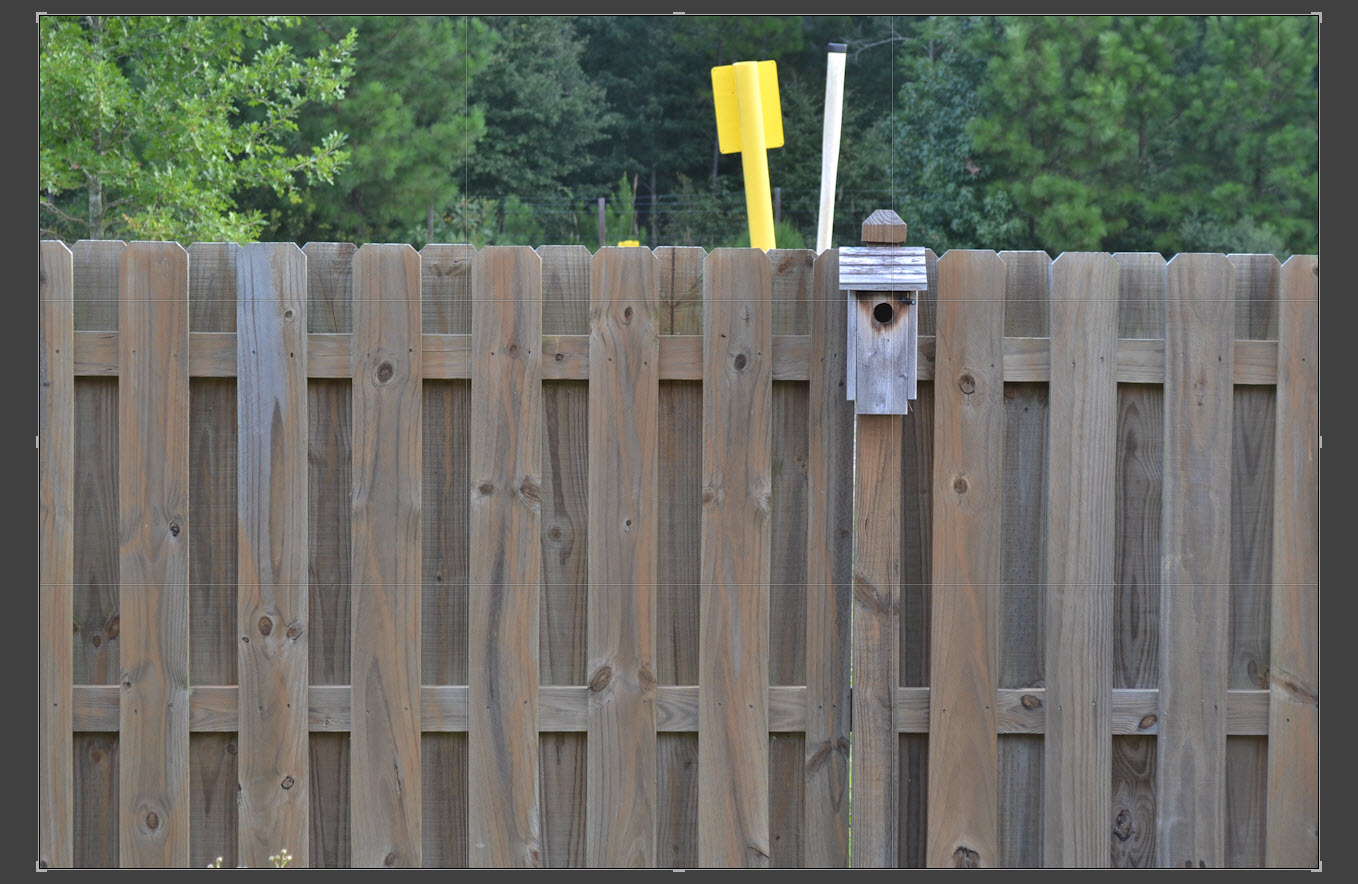
Rule of Thirds with the Canon Rebel T2i so now that I have a Nikon I figured I'd do the same thing. The Nikon D3100 has 11 focus points compared to 9 on the T2i. Below is a series of photos taken with each of the 11 focus points. As best I could I aligned the focus point with the hole in the bird house. The pictures are screen captures taken from Lightroom crop screen so you can see the Rule of Thirds grid lines. Click on an image to view a larger version of it which will make it much easier to see the grid lines.


Seems over time my PhotoShop skills have gotten worse instead of better. I suppose it doesn't help that I rarely use PhotoShop :). Above is a simulated focusing screen for the Nikon D3100. The numbers represent each of the focus points. The numbers below each picture shows which focus point was used to take the shot.


01 - Taken with the center point which puts the focus right in the center of the screen.


02 - Kind of handy because it falls just above the upper grid line.


03 - Bingo. This is the focus point you'll want to use to align things in the upper right hand intersection of the rule of thirds grid.


04 - Too far right.


05 - Could be useful since it intersects the vertical grid line.


06 - I'm wondering if I didn't get the camera lined up properly for this shot. I would have expected it to be closer to the intersection of the two grid lines than it is.


07 - Handy for alignment along the bottom grid line.


08 - Like #6 I expected this to be closer to the intersection of the grid lines.


09 - Handy for alignment on the left vertical grid line.


10 - Too far left.


11 - Very close to the intersection of the grid lines like shot 3 was. I will use this one for subjects on the left side of the scene.

Hope this helps!

Friday, September 7, 2012

Bad Elf GPS Pro Road Trip

One of my previous complaints about the Bad Elf GPS Pro was with transferring log files. On my trip home from North Carolina I decided I would put the tracker and the software to a big test by recording a single track of my drive home. The map above shows the route we took. I'm happy to report that the application was able to transfer the entire route on the first try! I'm impressed. Way to go Bald Elf team!

A few things I've figured out from using the tracker and software for a few weeks now:

  1. If you don't plan on tracking your trip on your iDevice then turn Bluetooth off. Seems kind of obvious doesn't it but I can't tell you how many times I've recorded tracks with it on. Leaving it on won't cause any problems but why waste the battery power using Bluetooth if nothing is connected.
  2. Before transferring your logs, especially large ones, close all other applications other than the Bad Elf GPS software. That frees up memory and seems to make the transfers run faster.
  3. Don't forget to turn off the back lighting. I have a habit of leaving the back light on when I turn the GPS Pro on which only wastes battery resources, especially if you put the tracker in your pocket like I often do.
  4. Keep an eye on the battery level. My unit seems to take a while to use up the first 75% of the available battery but once it reaches about 25% battery power left it seems to go quickly. What I usally do is when I see that the battery is down around 25% left is plug it into the charger when going to bed and allow it to charge overnight while I sleep.

Have any tips for using the GPS Pro or the application? If so let's hear them.

Wednesday, September 5, 2012

Tracking my Jet Ski Ride with the Bad Elf GPS Pro

Over the holiday weekend I went for a ride on my sister's jet ski. The image below shows the track log from it. I stored the GPS Pro in the storage compartment of the jet ski and it never loss satellite lock. You can click on the image to view a larger version of it.

Tuesday, September 4, 2012

Nikon D3100

Yes that is what you think it is. I now own a Nikon DSLR. Someone may want to check hell and see if it's still hot because I am sure there have been times in the past when I've said that I would only own when hell had frozen over.

I bought this camera for one specific purpose: Timelapse photography. Yes I could use my Olympus E-M5 camera and I actually created one using it but considering that for a 12 second timelapse video played back at 30 FPS using a shooting interval of 2 seconds takes 720 shots to create, I would prefer to not put so many shutter actuations on the camera.

I will also admit that there are some features that a DSLR provides that will make timelapse much easier for me. For example having a Manual Focus (MF) / Auto Focus (AF) switch on the lens is very handy. Using this I can use AF to set the initial focus and then switch the lens to MF and the focus will not change for the series. Before buying this camera I looked on Craigslist for used Canon gear and everything I could find was outside of my budget. This camera body and lens combo was on sale for $499 so I decided to take $500.00 from the money I had been saving for a lens for the E-M5 and buy this camera setup. I'll eventually get that lens for the E-M5 especially since it was recently released and it's very hard to find anyone that has it in stock.

Monday, September 3, 2012

LensProToGo 52 Week Photo Project - Week 35 Submission

My submission for Week 35 themed Looking Out

My sister's dog, Sebastian, or Sabby as we call him, looking out over his domain. He often sits and looks out the window searching for squirrels or rabbits to wander into his domain. Funny thing about this photo is it is one I created using the Instagram application. I like it better than the other shots I had taken trying to capture the moment.